Tutorial: Creating the "Giant Slayers" mod
UnrealScript uses a C-style syntax, and is similar to working with C++ or Java. If you don't know a thing about Programming and Object-Oriented Programming, you'll probably be quite lost, but that's beyond the scope of this wiki.
If you don't know a thing about UnrealScript or UE3 in general, you'll want to refer to the UDN documentation and other materials on the Code homepage.
In this tutorial, we're going to create a brand new mod with a new game mode based on AOCFFA (Chivalry's free-for-all mode), but with a twist: every kill makes you bigger and more powerful, but getting killed resets that bonus.
Step 0: Get a decent UnrealScript editor
There's a few options here that should work:
- There's an UnrealScript addon for Sublime Text that's available at https://github.com/Zinggi/UnrealScriptIDE/wiki/Getting-Started
- nFringe might work
- Notepad++ is a decent general text editor that'll do fine in a pinch
- anyone have any other editors/IDEs that will work with Chivalry? Let us know
Step 0.5: Set up some sort of source control
If you have no idea what to use:
- I'd recommend using a hosted Git repository, either with GitHub (all GitHub repositories are Public unless you pay for a premium account) or BitBucket (which offers free private repositories with limited users). My own Chivalry example mod repositories are on GitHub so they're easily publicly-accessible.
- Want a nice Git GUI for Windows? I kind of like SourceTree. TortoiseGit is another popular one, and they'll get along together well enough if you just want Tortoise for the Explorer integration. There's also GitHub's Windows GUI.
- GitHub's Bootcamp is a basic guide to getting starting with Git and GitHub
Step 1: Creating the new script package
When I talk about file paths, I'm going to assume you're looking at your Chivalry directory, instead of referring to the entire path every single time. By default, you'll find Chivalry in
C:\Program Files (x86)\Steam\SteamApps\common\chivalrymedievalwarfare
but this depends on where your Steam library is. So, when I give a directory like Development\Src I really mean something like C:\Program Files (x86)\Steam\SteamApps\common\chivalrymedievalwarfare\Development\Src
i. Create a directory
Create a new directory in Development\Src, name it GiantSlayers – this is the name of your script package; for simplicity, this should always be your mod's name
ii. Create a Default_.ini
In Development\Src\GiantSlayers, create a new text file, DefaultGiantSlayers.ini – notice that the name of the .ini has to match up with the name of the script package – Open this ini file up, and add the following:
[Engine.GameInfo]
DefaultGame=GiantSlayers.GiantSlayersGame
This tells the server which game mode to start when a server is started with ?modname=GiantSlayers. We haven't created GiantSlayersGame yet, so as the last step, let's do that:
iii. Create a game mode
Create Development\Src\GiantSlayers\classes – this is where your UnrealScript code is going to go
Create a file GiantSlayersGame.uc in Development\Src\GiantSlayers\classes ; open it up, and add this:
class GiantSlayersGame extends AOCFFA;

static event class<GameInfo> SetGameType(string MapName, string Options, string Portal)
{
	//returns this object's own class, so this class is setting itself to be the game type used
	return default.class;
}

defaultproperties
{
	//This is the name that shows in the server browser for this mod:
	ModDisplayString="Giant Slayers"

	//We won't leave these in here, but for now they'll let us see if the mod is actually loaded...
	SpawnWaveInterval=1
	MinimumRespawnTime=0
}
What are we doing here?
- This class is extending from
AOCFFAbecause, as we described above, GiantSlayers is going to be an FFA mod.AOCFFAis Chivalry's FFA mode's class. - Overridding
SetGameTypelets us override Chivalry's normal behaviour of setting the GameType based on the map's prefix. If you want to see an example of a mod that supports multiple game modes and uses map name prefixes, look at Instagib mod on GitHub and Tutorial: Creating a new mod, starting with the Instagib example. ModDisplayStringin thedefaultpropertiesblock should hopefully be self-explanatory.AOCGame(the superclass ofAOCFFAand all other Chivalry game types) uses this variable to set the mod's name in the server browser
Step 2: Compiling, and testing the new package
i. Set up a new profile in the SDK Frontend
Open the game from Steam. In the Launcher, click Launch editor. You'll be presented with the SDK Frontend, which is the tool we'll be using the help us compile, cook, and upload mods.
Click New Workshop Item
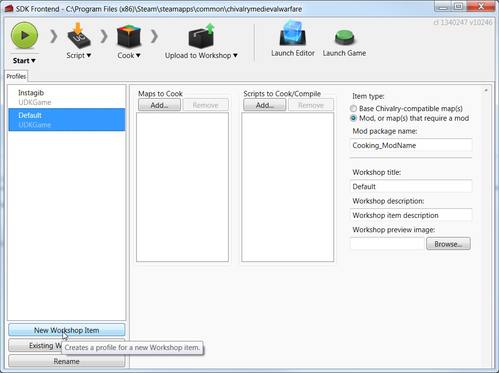
In the dialog box that opens up, enter in Giant Slayers as the mod name, and click OK
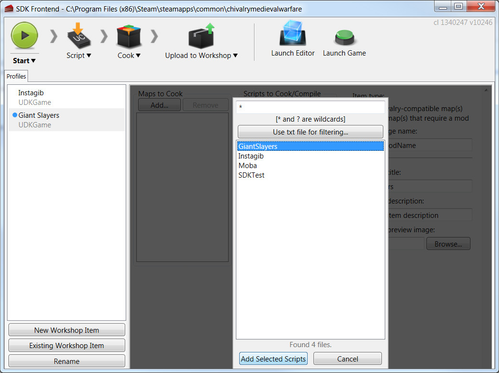
Under Scripts to Cook/Compile click on Add... ; select GiantSlayers to highlight it, then click Add Selected Scripts
Fill in the information on the right side. You'll also need an image (a PNG or JPEG). At the end of it, your profile should look similar to this:
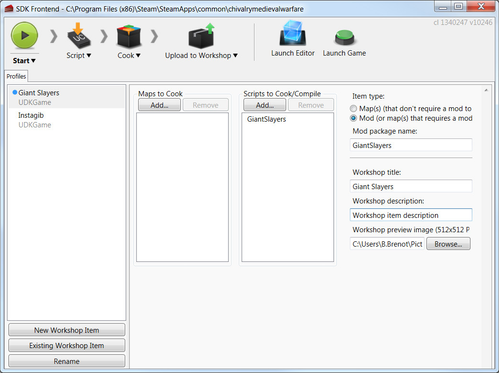
If you're making a mod that's really intended for public consumption, it should have a unique name. Don't use Giant Slayers, since there's this tutorial and it's bound to be used by several people ![]()
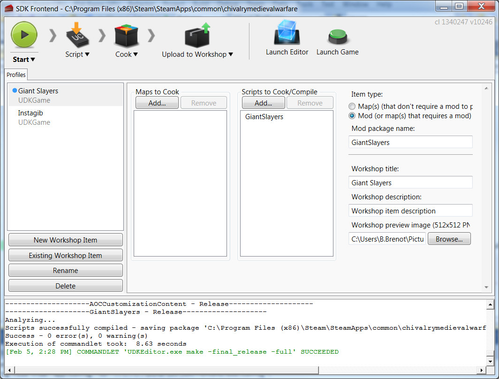
ii. Compile Giant Slayers
Click the Script button in the frontend, then click Compile scripts. If everything goes well, the last message in the log pan should be green with SUCCEEDED in it.
iii. Test the newly-compiled mod
By default the game will only use cooked mods. If you want to run an uncooked mod, you'll need to use SDK - Launch game sdkcontent.bat in the root Chivalry directory (or create a shortcut or batch file to Binaries\Win64\UDK.exe with -sdkcontent)
Alternatively, cook your mod (Click Cook in the Frontend, click Cook Packages) and then start the game normally (you can use the Launch Game button in the Frontend)
There's a bug currently in the Frontend. You need to Cook Packages twice when you're first cooking a new mod, otherwise it won't copy the mod's Default_.ini into the cook output directory
Either way, when you're in the game, open an FFA map through the console (default: ` or Scroll Lock) with ?modname=GiantSlayers at the end of it (e.g. open aocffa-moor_p?modname=GiantSlayers):
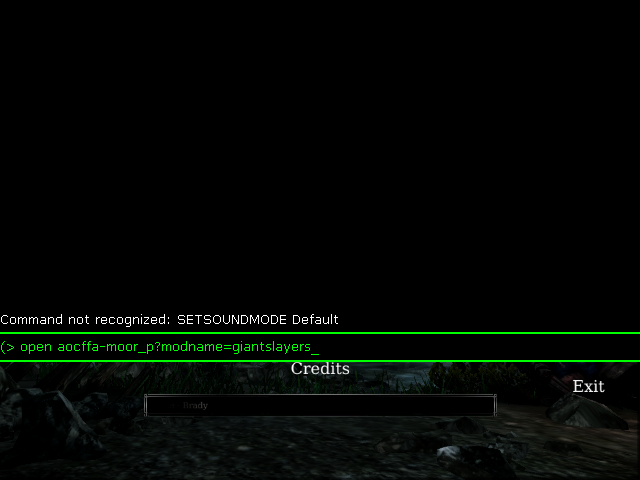
Hit enter and the map will load with the mod. Right now, the only thing you'll notice if it's running is that the respawn delay is reduced to 1 second or less, but hey, it's a start!
Step 3: Setting up the new pawn class
We're going to need a new pawn class that can grow and shrink. First thing's first though: what's a pawn?
AOCPawn and its subclasses (AOCTUTPawn, CDWDuelPawn, AOCNPC_New)
AOCPawn is Chivalry's Pawn class. A Pawn in UnrealEngine is like a "chess piece." It's an actual character or other controllable entity; AOCPawn is your actual character that runs around and swings weapons at people (siege weapons are similar entities so they're also Pawns, though they don't derive from AOCPawn). A lot of what makes Chivalry what it is comes from the particulars of how AOCPawn works. Every AOCPawn exists on the server and on every client for whom the Pawn is "relevant" (can be seen, or is otherwise gameplay-relevant).
Let's make us a new pawn.
i. Adding a new pawn
Create a GiantSlayersPawn.uc in Development\Src\GiantSlayers\classes
Let's just make a pawn. Easy enough:
class GiantSlayersPawn extends AOCPawn;
And we've got a new pawn! Let's put it in the game. Edit GiantSlayersGame.uc, override the DefaultPawnClass property like so:
defaultproperties
{
	//This is the name that shows in the server browser for this mod:
	ModDisplayString="Giant Slayers"

	//We won't leave these in here, but for now they'll let us see if the mod is actually loaded...
	SpawnWaveInterval=1
	MinimumRespawnTime=0

	//Use our new, custom pawn class instead of AOCPawn
	DefaultPawnClass=class'GiantSlayersPawn'
}
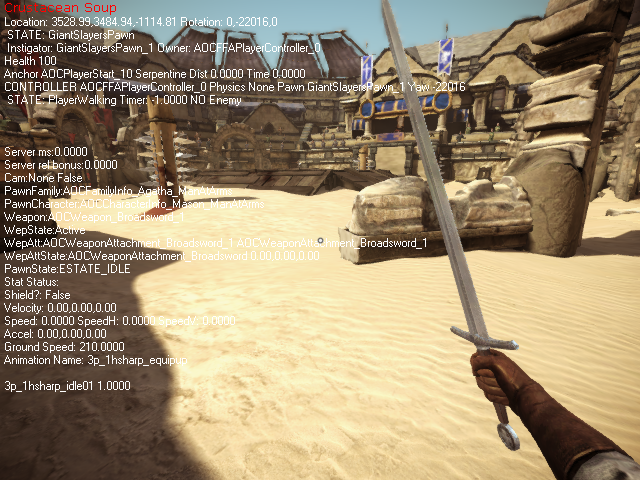
Now, follow the instructions to compile and test the mod again. This time, when you're in the game, open the console and use the showdebug console command. You'll get some debug text at the top-left. The third line includes your pawn's name (which starts with the class name) and its PlayerController's name. In the screenshot below, my pawn's name is GiantSlayersPawn_1, so it's evident that the mod is working and I've spawned as my new pawn class.
This pawn doesn't do anything though, it's just a renamed AOCPawn. Let's change that, shall we?
ii. Adding mesh scaling to GiantSlayersPawn
To start with, let's add a variable to hold the scale
class GiantSlayersPawn extends AOCPawn;

var float GiantScale;
And down at the bottom of the file, let's add in a defaultproperties block and set the default value for that variable
defaultproperties
{
	//start out mini!
	GiantScale = 0.6
}
Now let's actually maybe make it do something. We're going to SetScale on several of AOCPawn's components
function SetGiantScale(float NewScale)
{
	GiantScale = NewScale;

	//Taking a shortcut here by hardcoding the default scales/widths/heights of the components. Not good practice, but good enough for the tutorial.
	Mesh.SetScale(1.5 * GiantScale);
	OwnerMesh.SetScale(1.5 * GiantScale);
	Bubble.SetCylinderSize(NewScale * 39, NewScale * 65);
	CylinderComponent.SetCylinderSize(NewScale * 36, NewScale * 65);

	ForceUpdateComponents();
}
And let's make sure we actually start out tiny. We'll hook into SetCharacterAppearanceFromInfo, which is the function that sets an AOCPawn's mesh up. We'll set the scale after the super class' function completes (so the meshes will be set up)
simulated function SetCharacterAppearanceFromInfo(class<AOCCharacterInfo> Info)
{
	Super.SetCharacterAppearanceFromInfo(Info);
	SetGiantScale(GiantScale);
}
You might notice this won't compile. Bubble is a new variable; AOCPawn has a component (OuterCylinder) that it doesn't assign to a variable. Adding in Bubble, and combining everything:
class GiantSlayersPawn extends AOCPawn;

var float GiantScale;
var CylinderComponent Bubble;

simulated function SetCharacterAppearanceFromInfo(class<AOCCharacterInfo> Info)
{
	Super.SetCharacterAppearanceFromInfo(Info);
	SetGiantScale(GiantScale);
}

function SetGiantScale(float NewScale)
{
	GiantScale = NewScale;

	//Taking a shortcut here by hardcoding the default scales/widths/heights of the components. Not good practice, but good enough for the tutorial.
	Mesh.SetScale(1.5 * GiantScale);
	OwnerMesh.SetScale(1.5 * GiantScale);
	Bubble.SetCylinderSize(NewScale * 39, NewScale * 65);
	CylinderComponent.SetCylinderSize(NewScale * 36, NewScale * 65);

	ForceUpdateComponents();
}

defaultproperties
{
	//start out mini!
	GiantScale = 0.6
	Bubble = OuterCylinder
}
Try testing the mod now. You'll notice that everyone spawns with a tiny little pawn, including bots. How cute!
iii. Changing GiantSlayersPawn's scale whenever a kill is scored
Now, we just want to actually change the scale on-the-fly. Let's do it. Open up GiantSlayersGame.uc. We'll override AOCFFA's ScoreKill function.
function ScoreKill(Controller Killer, Controller Other)
{
	local GiantSlayersPawn GSP;

	super.ScoreKill(Killer, Other);

	GSP = GiantSlayersPawn(Killer.Pawn);

	if(GSP != none)
	{
		GSP.SetGiantScale(GSP.GiantScale * ScaleFactorPerKill);
	}
}
Now every time someone kills someone else, it grabs that player's Pawn, and increases their scale (if it successfully casts the pawn to a GiantSlayersPawn). Notice we added the variable ScaleFactorPerKill to control the amount to scale by. Let's combine all of this together:
class GiantSlayersGame extends AOCFFA;

var float ScaleFactorPerKill;

static event class<GameInfo> SetGameType(string MapName, string Options, string Portal)
{
	//returns this object's own class, so this class is setting itself to be the game type used
	return default.class;
}

function ScoreKill(Controller Killer, Controller Other)
{
	local GiantSlayersPawn GSP;

	super.ScoreKill(Killer, Other);

	GSP = GiantSlayersPawn(Killer.Pawn);

	if(GSP != none)
	{
		GSP.SetGiantScale(GSP.GiantScale * ScaleFactorPerKill);
	}
}

defaultproperties
{
	//This is the name that shows in the server browser for this mod:
	ModDisplayString="Giant Slayers"

	//We won't leave these in here, but for now they'll let us see if the mod is actually loaded...
	SpawnWaveInterval=1
	MinimumRespawnTime=0

	//Use our new, custom pawn class
	DefaultPawnClass=class'GiantSlayersPawn'

	//Scale up 15% for every kill
	ScaleFactorPerKill = 1.15
}
Step 3 continued: On a server
This is great, we've got a mod that works when you play offline with bots and it's all pretty spiffy. We want to actually see if it works with other players though, because Chivalry's bots aren't terribly interesting.
iv. Testing the mod on a local server with two local clients
- Compile and cook the mod.
- Go into your Chivalry directory, and make a copy of SDK - Launch server.bat. Name it SDK - Launch GiantSlayers server.bat
Edit the batch file, make it look like this:
@Echo Starting the game
@start Binaries\Win64\UDK.exe server AOCFFA-Frigid_p?adminpassword=testpass?modname=GiantSlayers
Now we're going to have to shut off Steam support so we can test with more than one client on the same machine. This isn't necessary if you're having a friend help you test or such, but you often have to test on your own for faster iteration while you're working on something.
Remember to reenable Steam support when you're done testing!
- Browse into UDKGame\Config and open DefaultEngine.ini.
- Find
[OnlineSubsystemSteamworks.OnlineSubsystemSteamworks] - Under that section heading, add a new line:
bEnableSteam=false
- And finally, we can test it!
- Open SDK - Launch GiantSlayers server.bat. The server will start.
- Click Launch Game in the Frontend, or just open the game normally. Open the console and do:
open 127.0.0.1 - Launch the game a second time, and join the server the same way
- Add some bots if you want to too
- in the console, assuming you left the password as it is above, do:
adminlogin testpass - then, add 10 bots with:
admin addbots 10
- in the console, assuming you left the password as it is above, do:
Play around with this for a bit, and you'll quickly notice that the mod doesn't work at all. Why? We haven't hooked up any networking code at all. The scale changes are being made, but they're staying on the server. That's no good, we need to fix that.
v. Replicating GiantSlayersPawn's scale
see Replication for more information on the fun world of network replication within UE3
We need to do some things to get Giant Slayers to work over the network.
a. Replicate GiantScale
GiantScale should replicate; i.e. it should be transferred over the network from the server to clients so they know what the value is. This is easy to accomplish. Add a replication block after the variables but before the functions:
replication
{
	if ( bNetDirty )
		GiantScale;
}
This is all you need to cause GiantScale to replicate from the server. This isn't enough to actually change the pawn's scale on the server, though, since we also need to trigger SetGiantScale on clients.
b. Make GiantScale a repnotify variable
Change GiantScale's declaration:
var repnotify float GiantScale;
Now, whenever GiantScale is modified, this Pawn's ReplicatedEvent function will be called. We need to actually implement the functionality for that, of course, or nothing will happen. Let's do it. Add in a new function:
/** Do something when a repnotify variable is replicated. */
simulated event ReplicatedEvent(name VarName)
{
	super.ReplicatedEvent(VarName);
	if (VarName == 'GiantScale')
	{
		SetGiantScale(GiantScale);
	}
}
Now, if SetGiantScale is called on the server, it will modify the GiantScale variable. GiantScale will soon replicate from the server to the clients; when a client version of the pawn gets a new copy of this variable, that client pawn will call SetGiantScale. There's just one more thing we have to do: add the simulated keyword to the SetGiantScale function.
simulated function SetGiantScale(float NewScale)
Informally, the simulated keyword means that a function is allowed to run on client versions of this object (more details in Replication).
Now, if you test the mod everything will work, even on a server.
vi. Adding health scaling
As an exercise, try to add health scaling yourself. We want max health to scale up by ScaleFactorPerKill just like size does. It's up to you what this does to the pawn's current health, but I'm just going to make that scale up by the same amount.
I'm going to just gloss over the solution to health scaling and show the final pawn class as a whole, including the health scaling feature. Don't look at this if you want to try implementing it yourself:
Step 4: Cooking, uploading, and running it on a dedicated server with autodownloading
Test it again and make sure everything works. When it does, all that's left is to cook the mod, upload it to Steam, and set up the Workshop page.
See: Tutorial: Compiling, testing, cooking, uploading, and running a mod
Step 5: Where to go from here
You might want to read the next mod tutorial, Tutorial: Creating a new mod, starting with the Instagib example, which explains how to create a new mod based on Instagib. Unlike Giant Slayers, Instagib replaces several different Chivalry game modes, so it's structured a bit differently.
Alternatively, maybe you'll want to skip that and go straight to Chivalry's scripts: what's what?; this document explains further about how Chivalry's code is laid out, and other things to replace to expand its functionality.
The Giant Slayers mode itself has evolved since I initially implemented it for this tutorial. To see the newest version, see http://steamcommunity.com/sharedfiles/filedetails/?id=226726898 and https://github.com/BradyBrenot/chivalry-giantslayers
Related articles