
In this section, I will briefly outline the initial setup needed to create a Team Objective Map for Chivalry. A Burnable Objective will be used as a simple example.
You can work from the example map provided, or your own. For the sake of this example, I will be using the example map AOCTO-1_BasicSetup_Ex. I will assume you know how to setup the other basic map functions, such as spawn points and world properties, if not, check out the other example maps.
--
For a non-objective based actor, you will need an AOCObjective_Generic somewhere in your map. You can find it in the actor menu of the Content Browser. Objectives such as the Ram, Assassination (King), and Signal Fire use their own special code driven actor. AOCObjective_Generic will give the freedom to drive the objective through Visual Scripting in Unreal Kismet. For this objective, you will need to place the following in the level:

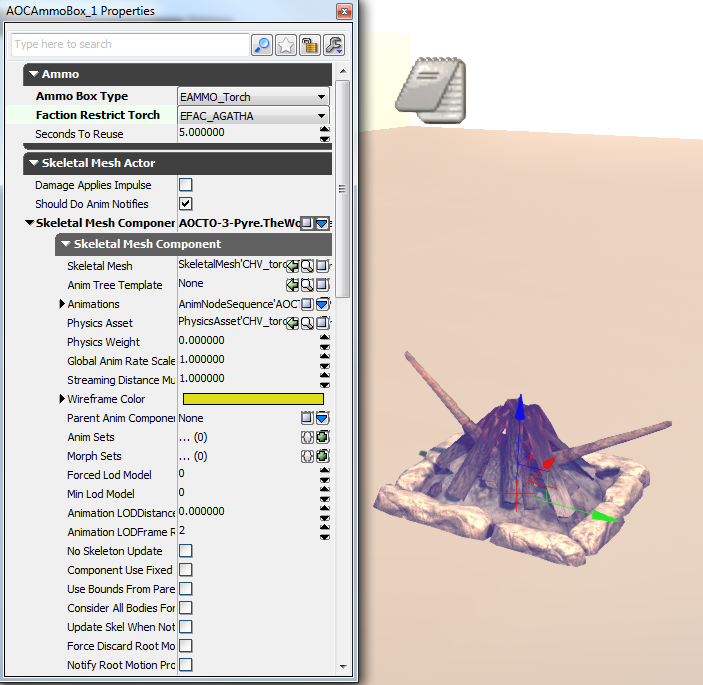
An AOCAmmoBox is also needed.
Faction Restrict it to EFAC_Agatha, and set the Ammo Type to EAMMO_Torch.
The Skeletal Mesh is: SkeletalMesh'CHV_torchpit.Meshes.Sk_Torchpit'
Make sure that under the Skeletal Mesh Component, you assign it a Physics Asset: PhysicsAsset'CHV_torchpit.Meshes.Torchpit_Physics'
Once you have all of these actors in place, click the green "K" in the top menu bar to open Kismet.

Most of this is explained in the Kismet comments, so I will only go into detail on the TO relevant nodes. Use the basic setup from the example map:

Register Objective Sequence is the first Kismet Action I will go over.
In this node, you are setting the name of your objective, and the description that shows on the scoreboard. Bonus time is the time added upon completion. Through code, when an objective complete even fires, it will move to the next stage.(I will show how to set that part up further down.)

So set the objectives you want in here, then move to the next node, Activate Primary Objective Stage.
Hook the Generic objective into this. This Action is what moves the objective to the next stage after the complete event is fired.

The first Toggle on the left is activating the hud markers for the burnables. It then plays a fire particle, swaps the material, and then disables after ten seconds. The most important part of this chain is the switch. You can burn them in any order, each enters the switch. Once it's count hits 2, it fires an objective complete event for the generic objective actor, and registers the sequence for the next objective, in this case, the pushable.

Here is a breakdown of the previous Kismet:
1: On Level Reset, HUD Markers are enabled. The take damage gates are opened. In this case, gates prevent players from burning the torches before the round begins

2: The Burnable Kismet between the left and right Burnable is identical, so I am only showing the Left Burnable script.
When taking Damage from a torch, an event is fired. It passes through the now open gate, and triggers the next sequence.


3: The take Damage event triggers these simple toggles. The first two disable the HUD, and activate a fire particle. There is then a 10 second delay, which lets the fire particle burn for 10 seconds, then switches the material to a charred black one. There are two material id's on this particular mesh, hence the two nodes.

4: After completion (the moment the HUD is turned off, and the fire particles plays.) each of the two (or however many you want) objective elements fire into a switch. A switch is simply indexing a number every time an event fires into it. In this case, when it has been activated twice, it will fire into an AOCObjective Complete event for the Generic Objective.

The AOCObjecive Complete Event then activates the next objective, in this case, a pushable.

There are two cases to consider after the first objective completes: Starting the next objective or ending the game.
Continuing from the image above, here are the first steps at carrying into the next objective. I will go more in depth later on nodes such as forward spawns, and changing spawns.
The main thing to do, is deactivate any HUD markers or Actors that are no longer relevant, open any gates that were blocking the next objective, and activate relevant HUD markers and Actors. Below, am playing a matinee to open the door blocking the Pushable. I am then enabling the Pushable HUD marker, and the AOC Trigger volumes associated with it.
You can store variables/actors(NO spawn points) in object lists to reduce clutter:

To end the game, and announce a winner, simply connect the output of AOCObjective complete into an End Team Objective Game action. This will award Agatha the victory.

Forward Spawning is relatively straight forward. Just use the Enable Forward Spawn Action.

Dynamic Spawning is simple, but requires some setup.
You need initial spawn points (AOCPlayerStart), and spawn points for the next objective for each team. The initial spawns will be set to the intended teams. The second batch of spawns should be set to EFAC_NONE.
After the first objective is completed, the new spawns will be switched from EFAC_None to EFAC_Mason and EFAC_Agatha, and the old disabled.
All of this will be done using 3 AOCSqeqAction_ModifySpawnPoint actions. From left to right, it is enabling the new spawns for Agatha, enabling the new spawns for Mason, and finally, disabling all of the old spawns for both teams.

This system is somewhat flexible, and there is nothing preventing changing of spawns during an objective.