...
What follows is intended to be a supplement to the many UE3 editor resources out there. We'll explain the unique steps you need to take to create a Chivalry map.
NabsterHax has submitted a very helpful video detailing the following steps:
| Widget Connector | ||
|---|---|---|
|
The Editor
1) Opening the editor:
There's two batch files, "- Editor 32-bit.bat" and "- Editor 64-bit.bat" inside the SDK directory (default: C:\Program Files (x86)\Steam\steamapps\common\chivalrymedievalwarfarebeta) that will open the 32-bit and 64-bit versions of the editor, respectively. The 64-bit editor is recommended.Open Steam and doubleclick on Chivalry: Medieval Warfare in your list of games to open the launcher. Click on 'Launch Editor' in the bottom left. This will open the SDK Frontend. Click on Launch Editor in the top bar of the Frontend.

2) Example maps:
...
The packages you've saved into ContentSDK are "uncooked" : they're in a production stage. You You can test them directly by opening the "SDK - Launch game sdkcontent.bat" file located in the root of your Chivalry folder , which will load all the packages contained in ContentSDK. You can test your map using the console command
open mapname
(where mapname is the name of your new map) Open one of your custom maps by pressing ~ to open the console and typing 'open mapname'
Example: 
6) Cooking your new map(s):
You have to cook packages before releasing them to the public. Get everything you want to cook into UDKGame\ContentSDK
Edit SDK - COOK.bat (open it in any text editor; notepad works), which is in the base game directory. Replace the map names (MyAwesomeMap, MyOtherMap) with your own; you can cook as many or as few maps at once as you want, but you need to specify at least one.
Double-click SDK - COOK.bat to run the cook. Your cooked map will be output to UDKGame\CookedSDK
The mod package GUID
After you cook, you'll notice that your map has cooked to a directory like UDKGame\CookedSDK\AOCSDKLevels_<GUID GOES HERE>. The bolded component there is the mod package's GUID. You'll want to save this GUID. In the future, when you want to recook this same map/mod package, you should add the guid to your cook command.
So, go ahead and copy SDK - COOK.bat and paste it into a new file. Call the new batch file something you'll remember that's related to your map's name. In this batch file, on the end of the last line, add:
| Code Block |
|---|
-Guid=xxx |
(So the line will look like .\Binaries\Win64\UDKEditor.exe CookPackages -log -nohomedir -platform=PC -SDKPackage=AOCSDKLevels MyAwesomeMap MyOtherMap -multilanguagecook=int -Guid=xxx )
Replace the "xxx" with the GUID from your new package directory. Now, when you cook again it'll replace the files in that directory instead of just creating a new one. This is very important if you want to use the Workshop since it lets you just update your existing item.
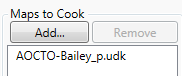
To Cook your maps, go back to the SDK Frontend. 'Choose Add...' and select from the list of maps in your contentsdk folder to cook.
Click the cook button at the top of the SDK Frontend.

7) Running cooked content locally (maps, mods):
Just start Launch the game as you normally would through Steam and the Chivalry Launcher. The game will load all packages in UDKGame\CookedSDK. Open one of your custom maps (use the open command in the console). Voila.by pressing ~ to open the console and typing 'open mapname'
Example:
8) Testing cooked and uncooked packages on a server:
...